How to troubleshoot a leaking mist system
There are a few places in a mist system that must be secure and clean to run leak-free and efficient all season long.
Leaking where the mist nozzle connects to the fitting:
Take your nozzle off and examine the nozzle and o-ring. If you notice any damage and cracks it may be time to replace the nozzles or the o-rings as needed. After you’ve examined them, replace the nozzles, making sure that they aren’t cross-threaded. You should only need to tighten them hand-tight. Tools are not recommended.
Leaking or dripping at the end of the nozzle:
Nozzles need clear, fine holes to effectively mist. If they become clogged or dirty, it can cause them to appear that like they are leaking as they drip. To clean your nozzle, remove it from the line and give it a gentle 30-minute soak in mist nozzle cleaning solution in a glass bowl. Be careful of acidic DIY recipes that may damage the o-ring. Calcium and mineral buildup is common in most residential water supplies and if it is causing issues with your nozzles, you may want to look into a calcium inhibitor/filter. The filter should go before any pumps on your hose faucet. It’s recommended to change the filter once a year.
Leaking at tubing connection
If your system is leaking at the connection between the tubing and the fitting, make sure your fittings are properly snug. If you have slip-lock connectors, see below.
Once you’re checked your fittings, make sure your water pressure is appropriate for your system. Out basic 3/8″ mist kits need between 45 and 80 PSI. If you are using slip-lock fittings, they will work better at higher pressures by design.
Leaking where the tubing connects to a Slip Lok fitting:
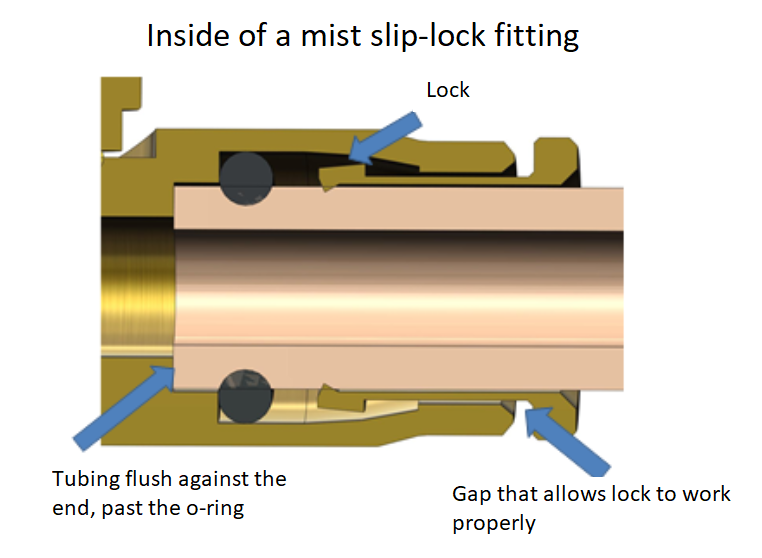
When a slip-lock fitting is used, the tubing must make it past the lock and o-ring that prevents any water leakage. For our mist slip-lock fittings, this means getting the tube in to a depth of 3/4″. It is common to discretely mark this spot on the tubing to ensure it makes it in all the way. Below is a picture of a properly fitted tube. The dark circles mark the internal o-ring. You may need to twist and push the tubing to ensure it makes it past this o-ring for a leak-free connection.

To remove a slip-lock connector and reinsert it, press the tubing and end of the connector inwards. Then, holding the connector in place, tug the tubing free. Examine the end of the tubing before reinsertion. If it is pitted, crimped, or creased, it may be a good idea to snip the end for a better seal on reinsertion.
Tubing leaking:
If there is a tear or hole in the tubing in a mist system, the tubing should be replaced. For systems with removable fittings and 3/8″ tubing, extra tubing is available in 20-foot and 2-foot lengths. Mist systems rely on high, steady pressure so patching is often not recommended or feasible.
Leaking at the end of the line
The end of your mist line could refer to the cap or plug on the end of your tubing or an auto-drain valve connected to the lowest mist nozzle space in your system. Check your cap or plug as you would any other connection, based on whether it is slip-lock or not. The auto-drain valve has a visible o-ring much like the mist nozzles that can be checked for damage or wear so can be checked in the same way.
An auto-drain valve that leaks when the system is off is doing exactly what it should so there’s no need to worry. Auto-drain valves automatically open when the pressure in a system is reduced to clear the line of water. This can help lengthen the life of your system and cut down on clogged nozzles.
If your auto-drain valve leaks when the line is pressurized, make sure that you are using at least 45PSI or the recommended minimum pressure for your system and that the valve is snug in its connection. If it has been taken apart, it may be missing parts that are needed to keep it closed.
Back to Support pageTags: buildup, calcium, clogged, connectivity, leaking, mineral, mist, nozzle, Public, system