Catch Cups Instructions
At Orbit, we love green grass and healthy plants and trees. We know you do, too. Our mission is to help you achieve your lawn, landscape and gardening goals, using the least amount of water possible. To help you do this, we have designed the Orbit Sprinkler Catch Cups and the Orbit Watering Schedule application.
The starting point for a successful sprinkler system is a great initial design. Great design needs to be complemented by great equipment. Finally, the sprinkler system needs to be well-maintained with compatible, consistent equipment. Orbit Sprinkler Catch Cups and the Orbit Watering Schedule application are the best way for you to check the quality of your system design, equipment and maintenance, and to set your sprinkler timer to deliver the right amount of water at the right time.
ASSEMBLY
Remove cups, rings and stakes from package. Slide each ring on to top of stake. The stake pushes into the ground and the cup sits in the ring.
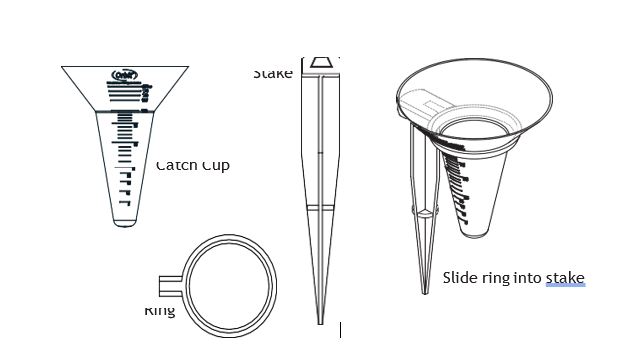
USING THE CATCH CUPS
Step 1:
Run a short test cycle for each sprinkler zone (“station”) and visually observe the following:
• Each sprinkler head is standing straight up and is not blocked by surrounding grass or bushes
• Each sprinkler nozzle is free from clogs and debris and is producing an even pattern
• Spray from each sprinkler head reaches all the way to the head(s) next to it
As necessary, adjust heads and nozzles so that they conform to the above conditions. Hint: Avoid performing a catch cup test when winds are above 10 miles per hour, as wind will skew the results
Step 2:
Draw a rough map of your property. Indicate the location of each sprinkler head. Indicate the station number that controls the sprinkler heads in each area, for example:
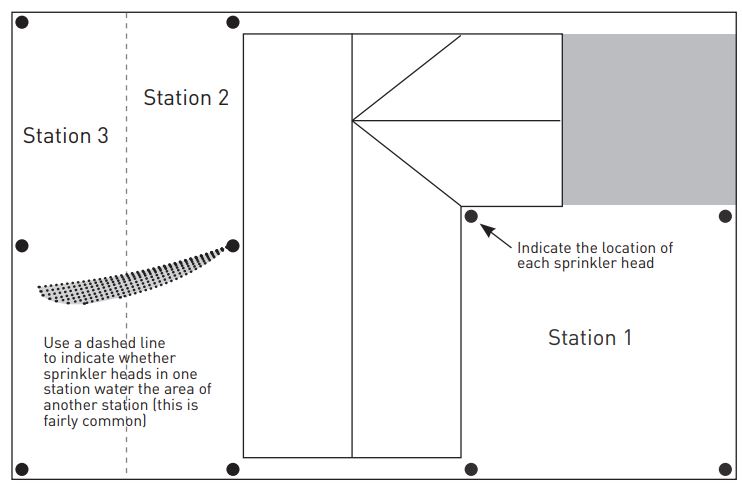
Step 3:
Place catch cups and stands in Station 1 area. Place one catch cup two feet away from each head.
Important: Spray from the sprinkler head should not hit the side of the catch cup. Place one catch cup halfway between sprinkler heads. The catch cup placement should be similar to the following:
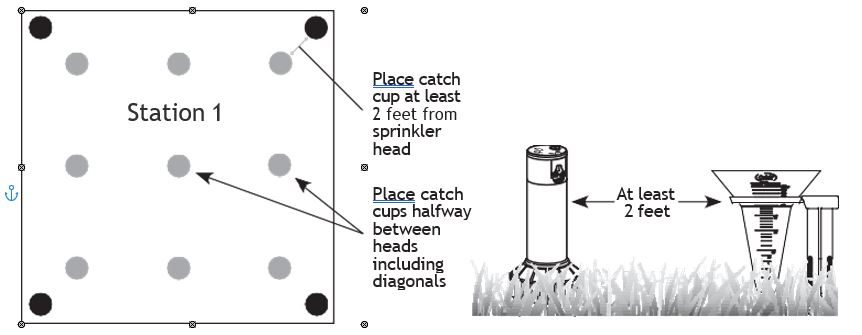
Step 4:
Run Station 1 for 10 minutes. Check water level in each cup. If more than a few cups are below 25ml, run the test for another 10 minutes and note on map that you ran Station 1 for 20 minutes.
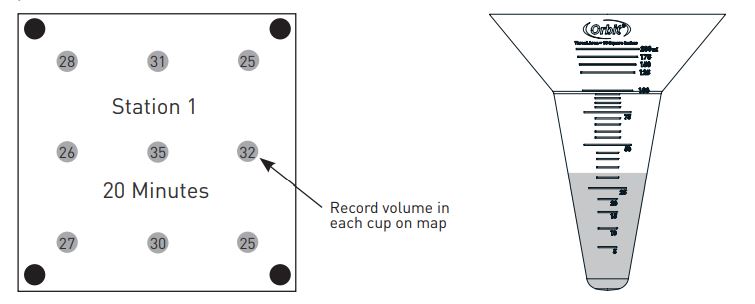
Important: If an area is watered by more than one station (as in example below where Station 3 sprinklers overlap Station 2 area), run each overlapping station for 10 minutes.
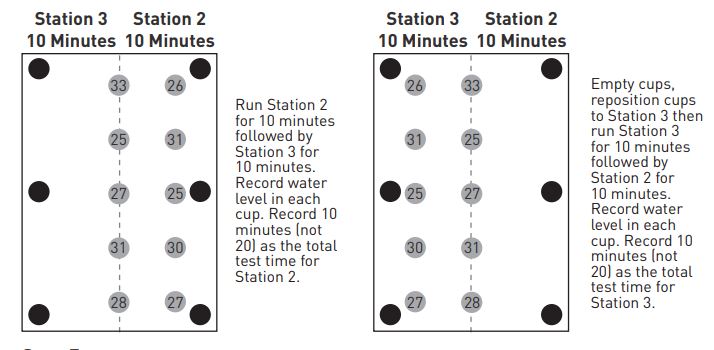
Step 5:
Repeat steps 3 and 4 for each station on the system, making sure to empty the catch cups after completing testing for each station.
Step 6:
When testing is complete, wipe dry each cup to prevent formation of rust and calcium deposits. Store cups away from direct sunlight to prevent discoloration.
USING THE CATCH CUP DATA
Beginning with Station 1, input the data for all stations into the Orbit Watering Schedule application (go to wateringschedule.com for more information). The output will include:
• Overall system efficiency (the quality of watering for each zone on a scale of 0-100)
• Problem areas and possible solutions
• Monthly Sprinkler System Schedule for each station
• Suggestions for customizing your schedule
Hint: After making any major adjustments to a station, we recommend that you repeat steps 3 and 4 above and input the updated results into the Orbit B-hyve application.
Back to Support pageTags: B-hyve, B-hyve App, Sprinkler