Traveling Sprinkler Assembly and Operating Instructions
1. Sprinkler assembly
Begin by inserting the black plastic T into the top of the sprinkler. Twist the long silver spray arms into the T, tightening the black rings until the spray arms are held securely in place.
2. Positioning the arms
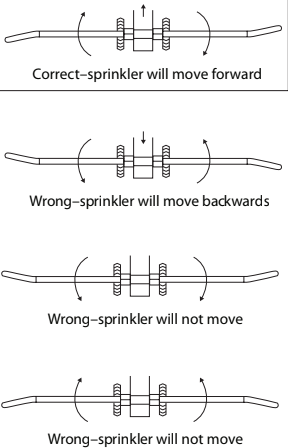
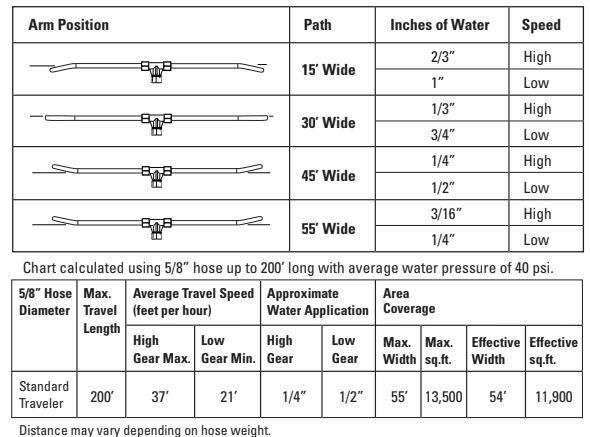
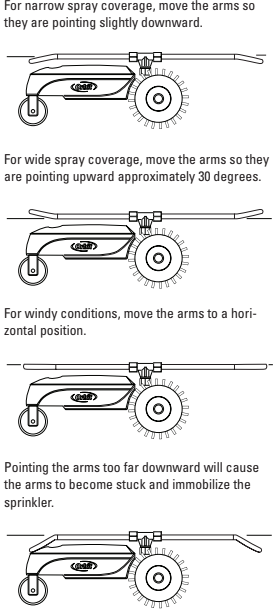
Positioning the spray arms correctly will ensure the proper operation of your sprinkler. Move each spray arm individually to adjust the watering diameter from a minimum of 15 feet to 55 feet. (If the arms are facing the wrong direction, this could cause your sprinkler to travel backwards)


3. Setting up the hose
Lay up to 200 feet of 5/8” hose in any pattern you select on a lawn that is fully grown–the sprinkler may not work on new or recently seeded lawns. Begin by creating at least a three-foot loop with the end of the hose to prevent pinching when connecting to the sprinkler. Do not create sharp turns in the hose pattern.
4. Positioning the shut-off ramp
The shut-off ramp may be used at any point along the hose pattern to stop the sprinkler. Place the automatic shut-off ramp over the hose where you want the sprinkler to stop, ensuring a minimum of 5 feet of straight hose on either end of the ramp.
5. Hooking up the sprinkler
Set the sprinkler on the hose so that the front tire is on the hose and the back wheels are on either side. Make sure the sprinkler is facing the direction you would like it to go. Hook up the hose to the rear of the sprinkler.
6. Setting the sprinkler’s speed
Select a traveling speed by pulling up on and rotating the dial on the top of the sprinkler. The sprinkler will travel from 0 to 37 feet per hour based on setting.
High: Select this speed for faster movement and light watering
Low: Select this speed for slower movement and heavier watering
Neutral: Select this speed for no movement; the sprinkler will remain stationary and water a designated area.
7. Running the sprinkler
Pull out the stopper underneath the sprinkler between the back wheels and turn on the water supply. The sprinkler will move at the speed indicated along the hose track, stopping when its shut-off plunger contacts the ramp stop.
8. Stopping the sprinkler
When the sprinkler comes in contact with the shut-off ramp, the incline causes the stopper to be pushed up, stopping the sprinkler.
9. Moving the sprinkler
Before repositioning the hose and moving the sprinkler to another part of the lawn, be sure to turn off the water first. Eliminate excess pressure from the hose and pull the sprinkler’s stopper back out before beginning again in a new area. It will be very difficult to move the stopper back down if water pressure remains in the hose.
10. Cleaning up
To keep the Orbit® Heavy-Duty Traveling Sprinkler operating within peak parameters, be sure that the filter washer at the hose coupling and the spray arms remain clean and unblocked. Consistently drain the sprinkler after each use by standing it on end for at least five minutes to ensure all water is eliminated from the sprinkler’s interior.
11. Preventing sprinkler damage
Use caution when picking up and moving the sprinkler–dropping it could potentially result in damage to the sprinkler or its parts. Do not force the sprinkler to move faster or slower along the track while it is in operation. Do not let the sprinkler become mired in thick grass or mud. Be sure there are no objects blocking the path of the sprinkler. The sprinkler is designed to move across grass only–never attempt to use the sprinkler on concrete driveways, sidewalks, or other hard surfaces. Doing so may result in severe damage to the motor assembly.
Here is a video that shows the setup for the Traveling Sprinkler:
Back to Support pageTags: traveling-sprinkler, videos